IntelliJ에서 코드 한 줄 안 짜고 JPQL 실행하기

관계형 데이터베이스를 사용하는 애플리케이션을 개발할 때 SQLStructured Query Language을 짜는 것은 피할 수 없는 일이다. Java 표준 ORMObject-Relational Mapping인 JPAJava Persistence API의 경우에도 다양한 조회를 위한 JPQLJava Persistence Query Language를 정의하고 있다.
SQL 경우 데이터베이스 클라이언트 도구로 실행하고 결과를 확인할 수 있어서 애플리케이션 코드에서 SQL만 떼어 검증하기 쉽다. 반면 JPQL은 JPQL만 따로 떼어 실행하고 결과를 확인할 수 있는 도구를 찾기가 쉽지가 않다.[1]
Java IDEIntegrated Development Environment 중 하나인 IntelliJ(Ultimate)는 JPQL만 따로 실행 가능한 JPA Console을 10 버전부터 지원하고 있다.
이 글은 JPA Console에서 JPQL을 실행하는 방법을 소개한다.
1 단계 - 예제 프로젝트 준비
JPA Console을 시작하기 앞서 먼저 JPA를 사용하는 프로젝트가 필요하다.
요즘은 JPA만 단독으로 사용하는 경우보다는 Spring Boot + Spring Data JPA로 많이 사용 있기 때문에 예제 프로젝트를 Spring Data JPA GETTING STARTED 페이지(Accessing Data with JPA)에서 가져왔다.
Spring Data JPA가 익숙하지 않은 분은 따라 하면서 프로젝트를 구성해도 되고 이미 익숙한 분은 필자의 GitHub에서 체크아웃 받아도 된다.
예제 프로젝트는 살펴보면, 별도 데이터베이스 설치가 필요 없는 H2 데이터베이스와 JPA 구현체로는 Hibernate를 사용하고 있다. 그리고 애플리케이션 실행 시 Customer 엔티티로 데이터를 생성하고 있다.
1 2 3 4 5 6 7 8 9 10 11 12 13 14 15 16 17 18 19 20 21 22<?xml version="1.0" encoding="UTF-8"?> <project xmlns="http://maven.apache.org/POM/4.0.0" xsi:schemaLocation="http://maven.apache.org/POM/4.0.0 http://maven.apache.org/maven-v4_0_0.xsd" xmlns:xsi="http://www.w3.org/2001/XMLSchema-instance"> <parent> <groupId>org.springframework.boot</groupId> <artifactId>spring-boot-starter-parent</artifactId> <version>1.5.9.RELEASE</version> </parent> <dependencies> <dependency> <groupId>org.springframework.boot</groupId> <artifactId>spring-boot-starter-data-jpa</artifactId> </dependency> <dependency> <groupId>com.h2database</groupId> <artifactId>h2</artifactId> </dependency> // ... </dependencies> // ... </project>
1 2 3 4 5 6 7 8 9@Entity public class Customer { @Id @GeneratedValue(strategy=GenerationType.AUTO) private Long id; private String firstName; private String lastName; //... }
1 2 3 4 5 6 7 8 9 10 11 12 13 14 15 16@SpringBootApplication public class Application { // ... @Bean public CommandLineRunner demo(CustomerRepository repository) { return (args) -> { // save a couple of customers repository.save(new Customer("Jack", "Bauer")); repository.save(new Customer("Chloe", "O'Brian")); repository.save(new Customer("Kim", "Bauer")); repository.save(new Customer("David", "Palmer")); repository.save(new Customer("Michelle", "Dessler")); // ... }; } }
Accessing Data with JPA 코드를 그대로 사용할 경우 애플리케이션 실행이 끝나는 시점에 데이터베이스에 있던 데이터가 다 없어지기 때문에 필자는 이를 방지하기 위해 application.properties를 추가하였다.
(spring.jpa.hibernate.naming.physical-strategy는 마지막에 따로 설명할 예정이므로. 지금은 설명하지 않고 넘어간다)
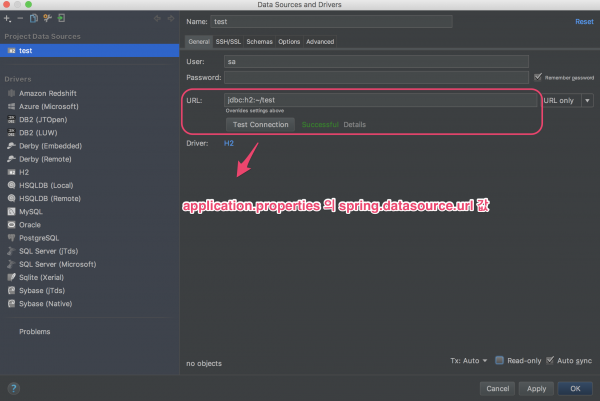
1 2 3 4# H2 file 모드를 사용한다 spring.datasource.url=jdbc:h2:~/test spring.jpa.hibernate.ddl-auto=create spring.jpa.hibernate.naming.physical-strategy=org.hibernate.boot.model.naming.PhysicalNamingStrategyStandardImpl
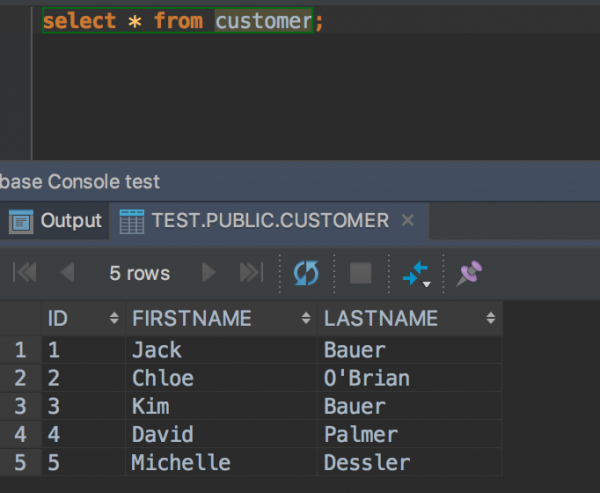
애플리케이션 실행 후에 데이터베이스 테이블을 조회해 보면 5건의 데이터가 생성된 것을 확인할 수 있다.
2 단계 - IntelliJ 설정
이제 만들어진 프로젝트에서 JPA Console을 사용하기 위한 설정을 해보자.
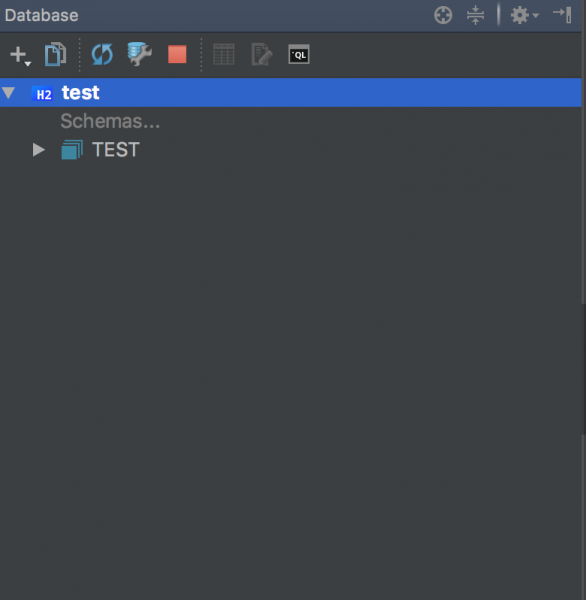
1 Database 창를 연다(View|Tools Windows|Database)
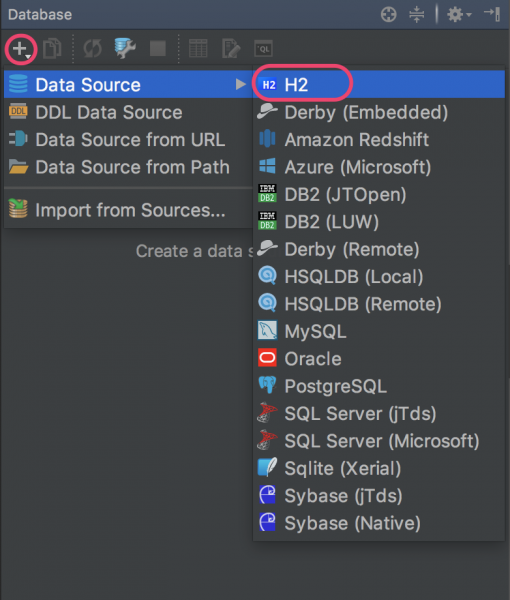
2 Datasource를 추가한다.(H2 데이터베이스)
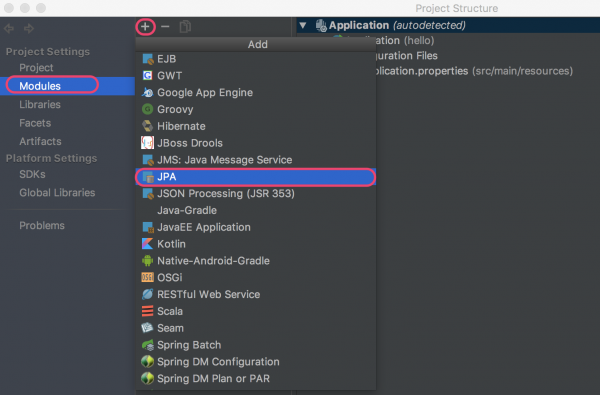
3 Project Structure 창을 연다(File|Project Structure)
4 JPA Module을 추가한다
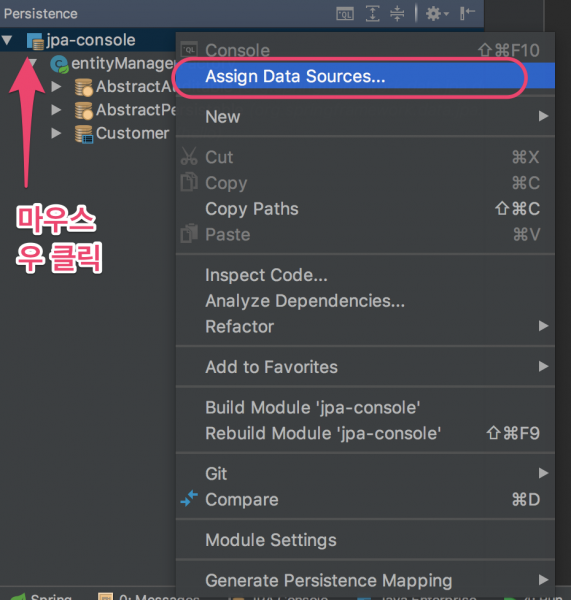
5 Persistence 창을 연다(View|Tools Windows|Persistence)
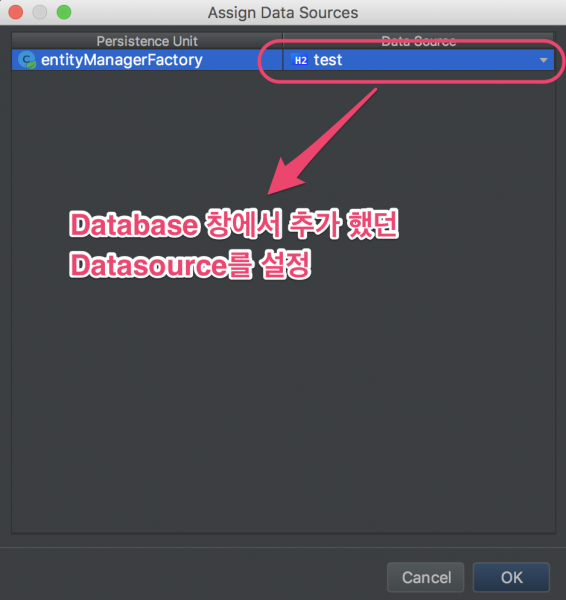
6 Datasource를 할당한다
3 단계 - JPQL 실행
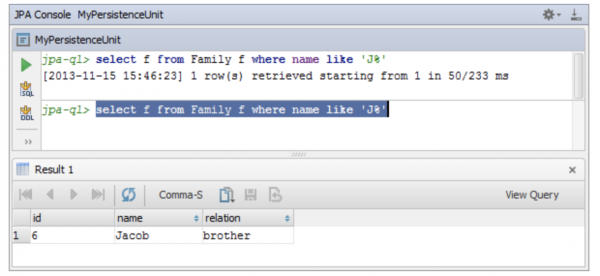
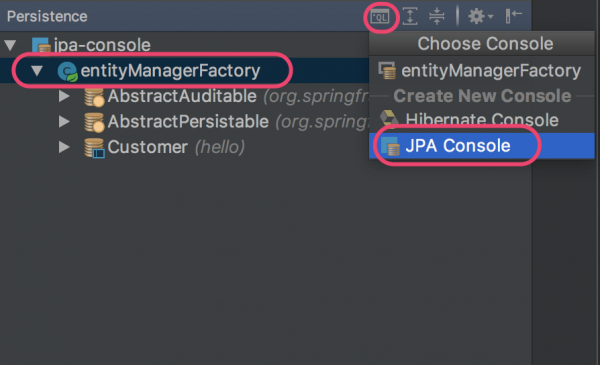
1 Persistence 창에서 JPA Console 창을 연다
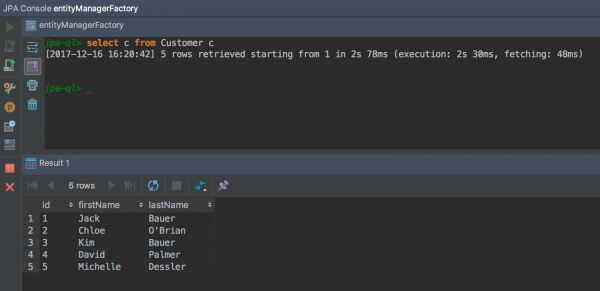
2. JPQL을 실행한다
(주의. H2 데이터베이스 파일 모드는 기본적으로 하나의 Connection만을 허용하기 때문에 Database 창에 H2 데이터 베이스가 연결되어 있다면 연결을 종료하고 시도해야 한다)
더 상세한 사용법은
아래 IntelliJ 공식 사이트에 상세한 사용법이 공개되어 있다.
- https://www.jetbrains.com/help/idea/working-with-the-jpa-console.html
- https://www.jetbrains.com/help/idea/jpa-console-tool-window.html
spring.jpa.hibernate.naming.physical-strategy
데이터베이스는 관례상 언더 스코어(_)로 단어와 단어를 구분하는데 반해 Java 코드(엔티티)에서는 카멜Camel 표기법을 따른다. JPA 구현체인 Hibernate는 이러한 문제를 해결하기 위해 이름 매핑 전략Naming Strategy을 제공한다.
Spring Boot에서는 기본적으로 이름 매핑 전략이 SpringPhysicalNamingStrategy이다.
By default, Spring Boot configures the physical naming strategy with SpringPhysicalNamingStrategy. This implementation provides the same table structure as Hibernate 4: all dots are replaced by underscores and camel casing is replaced by underscores as well. By default, all table names are generated in lower case, but it is possible to override that flag if your schema requires it. - https://docs.spring.io/spring-boot/docs/current-SNAPSHOT/reference/html/howto-data-access.html#howto-configure-hibernate-naming-strategy
SpringPhysicalNamingStrategy는 Java 코드의 카멜 표기를 언더스코어로 자동 변경해 준다.
문제는 IntelliJ JPA Console에서는 Spring Boot 기본 이름 매핑 전략(SpringPhysicalNamingStrategy)을 사용할 경우 오류가 난다는 것이다.

이 문제를 해결하기 위해 필자가 찾은 방법 중 하나는 이름 매핑 전략 PhysicalNamingStrategyStandardImpl으로 변경하는 것이었다. PhysicalNamingStrategyStandardImpl은 Java 코드의 카멜 표기법을 언더스코어로 변경하지 않는다.
1spring.jpa.hibernate.naming.physical-strategy=org.hibernate.boot.model.naming.PhysicalNamingStrategyStandardImpl
이름 매핑 전략을 변경하지 않고 JPA Console을 사용하는 방법은 @Column을 사용하여 엔티티에 데이터베이스 테이블 컬럼명을 직접 선언해 주는 것이다.
1 2 3 4 5 6 7 8 9 10 11@Entity public class Customer { @Id @GeneratedValue(strategy=GenerationType.AUTO) private Long id; @Column(name = "FIRST_NAME") private String firstName; @Column(name = "LAST_NAME") private String lastName; ... }
이와 관련한 문제를 InteliiJ 를 만든 JetBrains사에 문의 하였으나 명확한 답변은 받지 못했다.[2]
덧붙여
JPA Console 기능을 사용하지 않더라도 IntelliJ에 JPA 설정하면 JPQL을 코딩할 때 코드 자동 완성 기능이 활성화되어 편리하다.

주석
[1] 추정컨대 JPQL은 엔티티 코드와 함께 동작하는데 엔티티 코드는 애플리케이션 코드의 일부로 존재하기 때문일 것이다.
[2] 답변을 받긴 했으나, StackOverFlow나 Spring 커뮤니티에 문의하라는 내용이었다.