MySQL HA Test 를 위한 Virtualbox 네트워크 구성 - Part I

요즘은 AWS ( Amazon Web Service ), GCP ( Google Cloud Platform ), Azure 를 이용하면 쉽고 저렴하게 테스트 환경 구축할 수 있습니다. 그러나, 개인적으로 틈틈히 테스트 환경을 구축하는 경우에, 장시간 인스턴스를 죽이지 않아서 생각지도 않은 과금눈탱이을!? 맞아 본 분들이 많을 겁니다. 저같이 매달 카드명세서를 꼼꼼이 보지 않거나, Invoice 메일을 무시하다 보면 거지꼴을 못면합니다. ㅠㅠ
그렇기에 가난한 개발자, 엔지니어에게 있는 것운 노트북뿐!! Oracle VirtualBox 를 활용해보겠습니다.
서론
마음은 AWS !! 현실은 VirtualBox !!
이쁘게 Architecture Diagram 은 AWS 심플 아이콘을 이용해서 그려 봅니다.
https://aws.amazon.com/ko/architecture/icons/
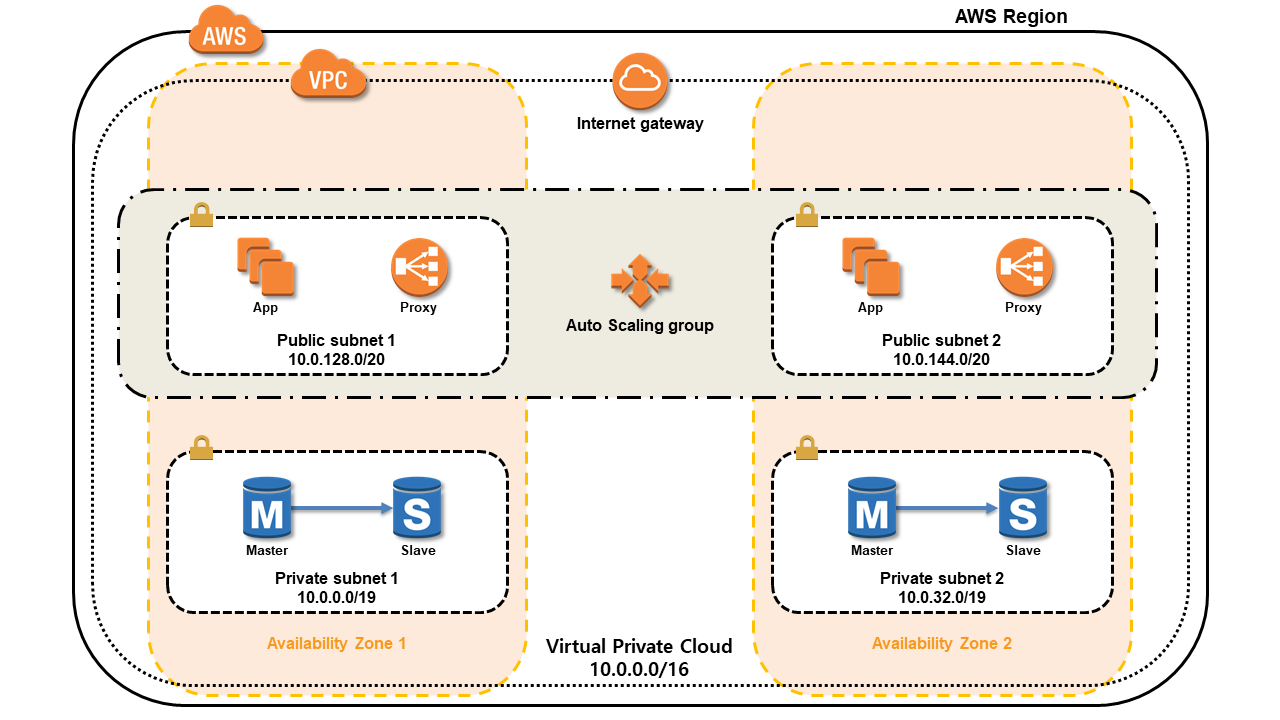
다음과 같이 구성할 수 있을 것입니다.
Availability Zone 1
- Auto Scaling
- App Server 1 .. n
- Proxy 1 .. n
- DB Master 1
- DB Slave 1 .. n
이 때 필요한 최소 서버 수는 App 1대, Proxy 1대, DB Master 1 대, DB Slave 1대로 총 4 대입니다.
그렇다면, VirtualBox 에서 VM Intance 를 4개 생성해서 각각 구성하는 방법과 VM Instance 를 1개만 생성하고, 계정별로 분리하거나 안하거나, DB Master & Slave 의 Port 만 달리하는 방법 등이 있습니다.
Quad Core + 16GB RAM 이상의 노트북이라면 4 VM 도 크게 무리가 없겠지만, 그렇지 않다면 상당히 무리가 갈 것입니다. 이럴 경우 필요한건 심플하게 App, Proxy 인데, 무거운 OS , 불필요한 demon 들! 과연 필요한가요?! 그래서, Docker 와 같은 Container 기반이 합리적이죠!? 그러나, 싫습니다!? ㅋㅋ
다음과 같이 테스트 환경을 가상으로 구성한다고 생각하고, VM Instance 1개 생성하고, Network Adaptor 를 추가해서 Port 별이 아닌, Domain or IP 기반으로 구성하겠습니다.
ex) Availability Zone 1 & 2
- Auto Scaling
- App Server 1 대
Proxy 1 대
- DB Master 1 대
- DB Slave 1 대
결국 VM 을 1개 생성해서, Adaptor 를 6개 ( AZ 1 : App, Master, Slave / AZ 2 : App, Master, Slave ) 추가하여 각각 IP 별로 구성해서 테스트환경을 구축하겠습니다. ( 방화벽 설정을 하시고 하시는게 조금 더 리얼하게 좋습니다. )
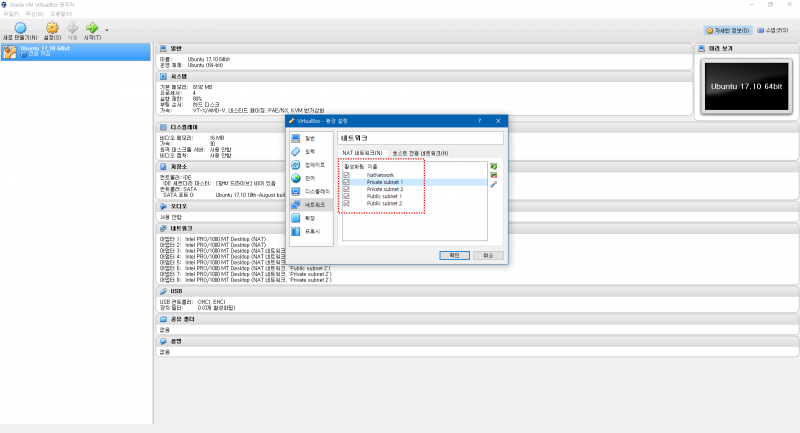
NAT 네트워크 추가
다음과 같이 VirtualBox 환결설정에서 NAT 네트워크를 추가해줍니다.
| 네트워크 이름 | Public subnet 1 | Private subnet 1 | Public subnet 2 | Private subnet 2 |
|---|---|---|---|---|
| 네트워크 CIDR | 10.0.128.0./20 | 10.0.0.0/19 | 10.0.144.0/20 | 10.0.32.0/19 |
서브넷 ( subnet ) 과 서브넷 마스크 ( mask ) 설명 참조
https://www.microsoft.com/korea/technet/deploy/tcpintro8.mspx
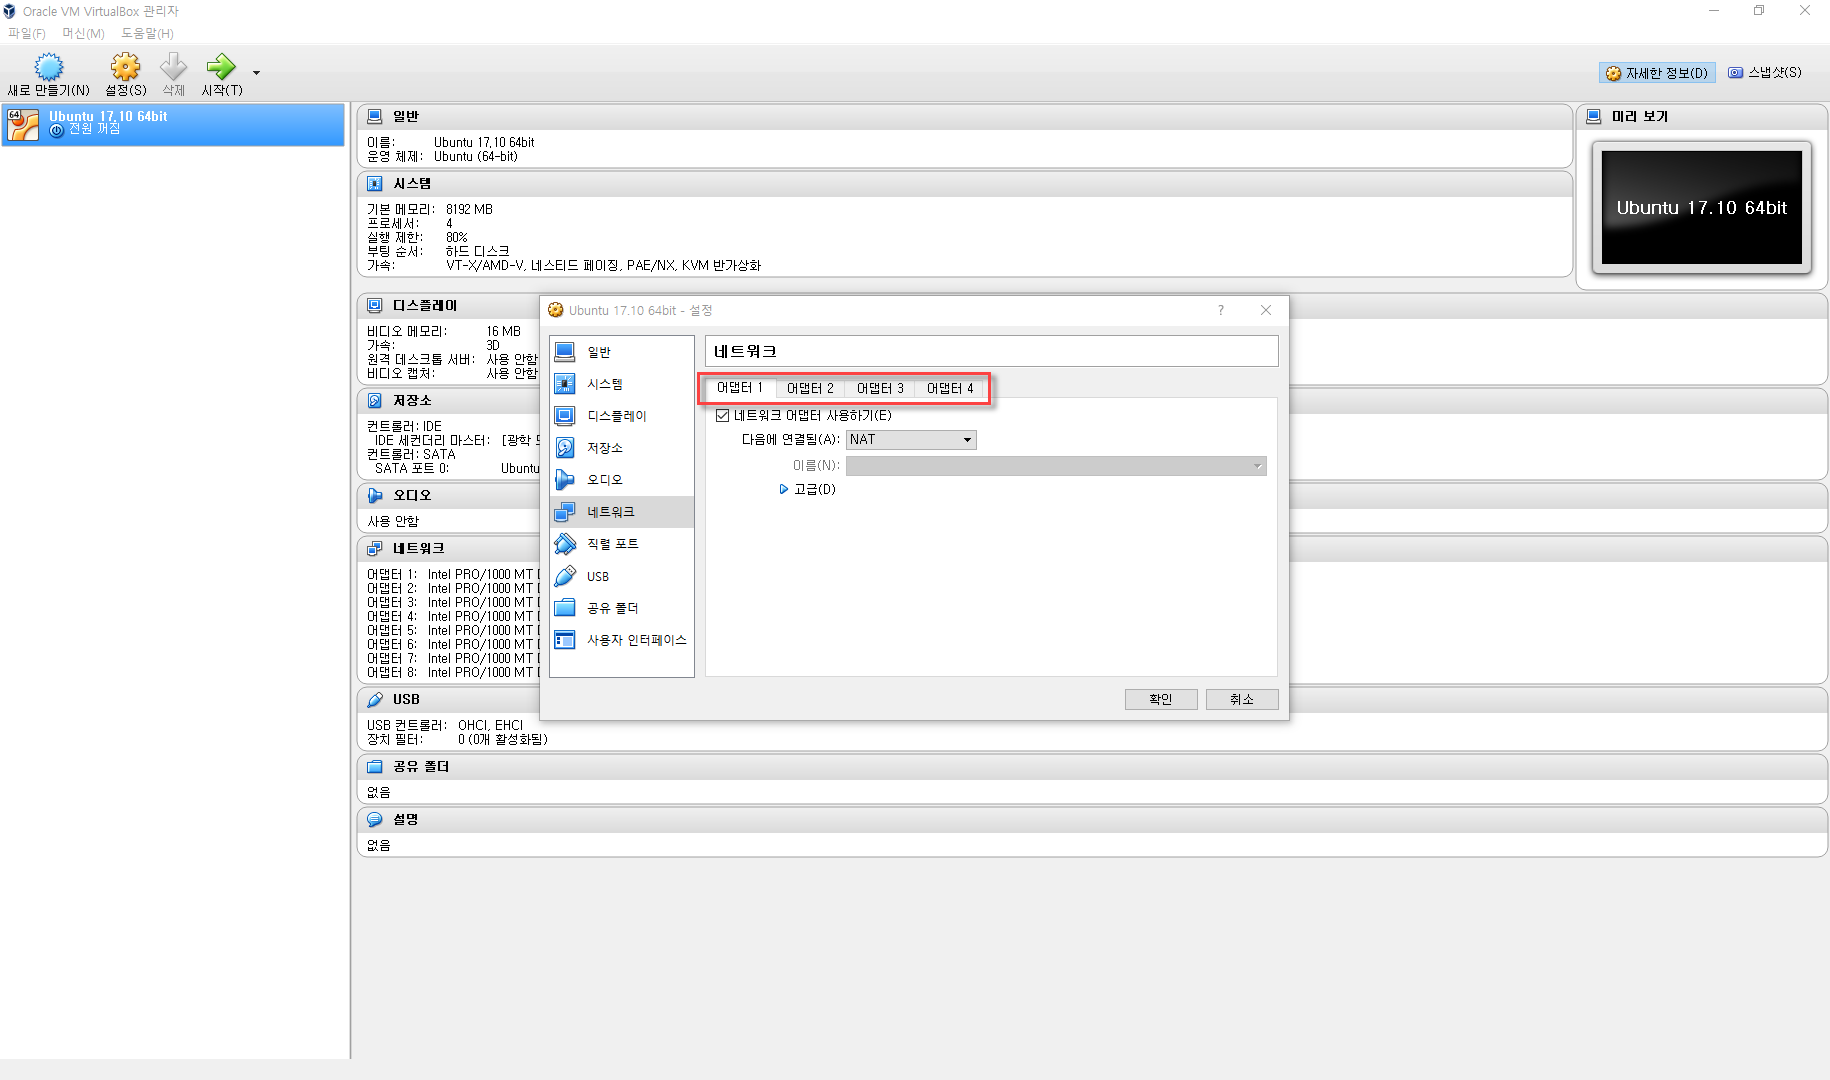
네트워크 어댑터 추가하기
Oracle VirtualBox 는 기본적으로 UI 상으로 어댑터를 4개만 표현합니다. 실제로는 총 8개 까지 사용할 수있습니다.
네트워크 어댑터 추가 방법
- VBoxManage Command 기반
- VirtualBox Machine Definition 설정파일 수정
1. VBoxManage Command 기반
다음과 같이 CMD 실행해주시면 됩니다.
C:\Program Files\Oracle\VirtualBox
1 2 3 4 5 6 7 8VBoxManage modifyvm "Ubuntu 17.10 64bit" --nic1 nat --nictype0 82540EM VBoxManage modifyvm "Ubuntu 17.10 64bit" --nic2 nat --nictype1 82540EM VBoxManage modifyvm "Ubuntu 17.10 64bit" --nic3 intnet --intnet3 "Public subnet 1" --nictype3 82540EM VBoxManage modifyvm "Ubuntu 17.10 64bit" --nic4 intnet --intnet4 "Private subnet 1" --nictype4 82540EM VBoxManage modifyvm "Ubuntu 17.10 64bit" --nic5 intnet --intnet5 "Private subnet 1" --nictype5 82540EM VBoxManage modifyvm "Ubuntu 17.10 64bit" --nic6 intnet --intnet6 "Public subnet 2" --nictype6 82540EM VBoxManage modifyvm "Ubuntu 17.10 64bit" --nic7 intnet --intnet7 "Private subnet 2" --nictype7 82540EM VBoxManage modifyvm "Ubuntu 17.10 64bit" --nic8 intnet --intnet8 "Private subnet 2" --nictype8 82540EM
2. VirtualBox Machine Definition 설정파일 수정
다음 파일에서 <Network> 를 수정 또는 추가해주시면 됩니다. 이 때 주의할 점은 각 어댑터의 MACAddress 를 다른 값으로 수정해주셔야 합니다!!
C:\Users\<USER>\VirtualBox VMs\<VM Name>.vbox
ex ) C:\Users\<USER>\VirtualBox VMs\Ubuntu 17.10 64bit.vbox
1 2 3 4 5 6 7 8 9 10 11 12 13 14 15 16 17 18 19 20 21 22 23 24 25 26 27 28 29 30 31 32 33 34 35 36 37 38 39 40 41 42 43 44 45 46 47 48 49 50 51 52<Network> <Adapter slot="0" enabled="true" MACAddress="0800278A826A" type="82540EM"> <DisabledModes> <InternalNetwork name="intnet"/> <NATNetwork name="NatNetwork"/> </DisabledModes> <NAT/> </Adapter> <Adapter slot="1" enabled="true" MACAddress="08002702F7A9" type="82540EM"> <DisabledModes> <InternalNetwork name="intnet"/> <NATNetwork name="NatNetwork"/> </DisabledModes> <NAT/> </Adapter> <Adapter slot="2" enabled="true" MACAddress="08002707944E" type="82540EM"> <DisabledModes> <InternalNetwork name="intnet"/> </DisabledModes> <NATNetwork name="Public subnet 1"/> </Adapter> <Adapter slot="3" enabled="true" MACAddress="08002780838F" type="82540EM"> <DisabledModes> <InternalNetwork name="intnet"/> </DisabledModes> <NATNetwork name="Private subnet 1"/> </Adapter> <Adapter slot="4" enabled="true" MACAddress="0800278083AA" type="82540EM"> <DisabledModes> <InternalNetwork name="intnet"/> </DisabledModes> <NATNetwork name="Private subnet 1"/> </Adapter> <Adapter slot="5" enabled="true" MACAddress="0800270794BB" type="82540EM"> <DisabledModes> <InternalNetwork name="intnet"/> </DisabledModes> <NATNetwork name="Public subnet 2"/> </Adapter> <Adapter slot="6" enabled="true" MACAddress="0800278083FF" type="82540EM"> <DisabledModes> <InternalNetwork name="intnet"/> </DisabledModes> <NATNetwork name="Private subnet 2"/> </Adapter> <Adapter slot="7" enabled="true" MACAddress="0800278083BB" type="82540EM"> <DisabledModes> <InternalNetwork name="intnet"/> </DisabledModes> <NATNetwork name="Private subnet 2"/> </Adapter> </Network>
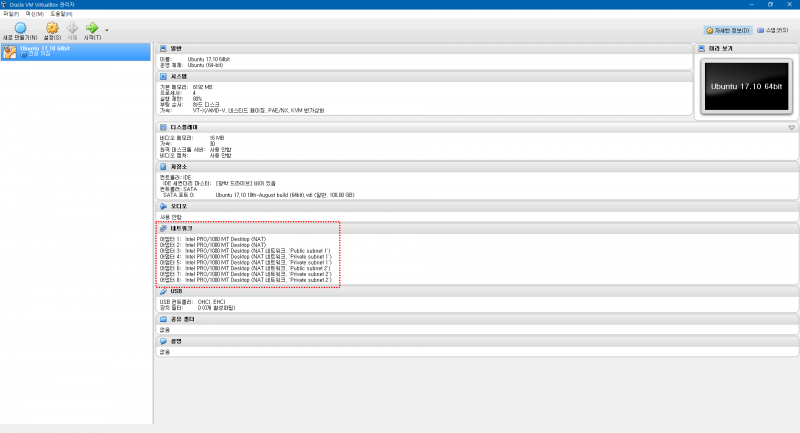
네트워크 설정 완료
다음과 같이 네트워크 어댑터를 8개까지 추가하였고, 다음과 같이 할당하였습니다.
| 어댑터 | NATNetwork Name | 설 명 |
|---|---|---|
| 1 | NAT | public |
| 2 | NAT | public |
| 3 | Public Subnet 1 | AZ 1 - Auto Scaling - App |
| 4 | Private Subnet 1 | AZ 1 - DB Master |
| 5 | Private Subnet 1 | AZ 1 - DB Slave |
| 6 | Public Subnet 2 | AZ 2 - Auto Scaling - App |
| 7 | Private Subnet 2 | AZ 2 - DB Master |
| 8 | Private Subnet 2 | AZ 2 - DB Slave |
결론
이제 VM 을 띄워서 계정을 만들고, App, DBMS 설치 및 구성하고, 방화벽을 설정하고, Domain & IP 를 설정하셔서 사용하시면 됩니다!! 그냥 전부 localhost 로 쓰는게 맘편할 것 같기도 하네요!! ㅠㅠ
1 2 3 4 5 6 7 8 9 10 11 12 13 14 15 16 17 18 19 20 21 22 23 24 25 26 27 28 29 30 31 32 33 34 35 36 37 38 39 40 41 42 43 44 45 46 47 48 49 50 51 52 53 54 55 56 57 58 59 60 61 62 63 64 65 66 67 68 69 70 71 72 73$ ifconfig enp0s3: flags=4163<UP,BROADCAST,RUNNING,MULTICAST> mtu 1500 inet 10.0.2.15 netmask 255.255.255.0 broadcast 10.0.2.255 inet6 fe80::5830:1833:d8a2:3ef7 prefixlen 64 scopeid 0x20<link> ether 08:00:27:8a:82:6a txqueuelen 1000 (Ethernet) RX packets 391 bytes 230612 (230.6 KB) RX errors 0 dropped 0 overruns 0 frame 0 TX packets 426 bytes 62745 (62.7 KB) TX errors 0 dropped 0 overruns 0 carrier 0 collisions 0 enp0s8: flags=4163<UP,BROADCAST,RUNNING,MULTICAST> mtu 1500 inet 10.0.3.15 netmask 255.255.255.0 broadcast 10.0.3.255 inet6 fe80::85f:ea8c:473c:bb67 prefixlen 64 scopeid 0x20<link> ether 08:00:27:02:f7:a9 txqueuelen 1000 (Ethernet) RX packets 17 bytes 1976 (1.9 KB) RX errors 0 dropped 0 overruns 0 frame 0 TX packets 198 bytes 17768 (17.7 KB) TX errors 0 dropped 0 overruns 0 carrier 0 collisions 0 enp0s9: flags=4163<UP,BROADCAST,RUNNING,MULTICAST> mtu 1500 inet 10.0.128.4 netmask 255.255.240.0 broadcast 10.0.143.255 inet6 fe80::f076:f843:26ac:5561 prefixlen 64 scopeid 0x20<link> ether 08:00:27:07:94:4e txqueuelen 1000 (Ethernet) RX packets 4 bytes 1830 (1.8 KB) RX errors 0 dropped 0 overruns 0 frame 0 TX packets 156 bytes 16154 (16.1 KB) TX errors 0 dropped 0 overruns 0 carrier 0 collisions 0 enp0s10: flags=4163<UP,BROADCAST,RUNNING,MULTICAST> mtu 1500 inet 10.0.10.7 netmask 255.255.224.0 broadcast 10.0.31.255 inet6 fe80::fdac:582c:e784:f4bc prefixlen 64 scopeid 0x20<link> ether 08:00:27:80:83:8f txqueuelen 1000 (Ethernet) RX packets 127 bytes 15201 (15.2 KB) RX errors 0 dropped 0 overruns 0 frame 0 TX packets 156 bytes 16065 (16.0 KB) TX errors 0 dropped 0 overruns 0 carrier 0 collisions 0 enp0s16: flags=4163<UP,BROADCAST,RUNNING,MULTICAST> mtu 1500 inet 10.0.20.7 netmask 255.255.224.0 broadcast 10.0.31.255 inet6 fe80::aaeb:6d9c:45dd:2923 prefixlen 64 scopeid 0x20<link> ether 08:00:27:80:83:aa txqueuelen 1000 (Ethernet) RX packets 152 bytes 18709 (18.7 KB) RX errors 0 dropped 0 overruns 0 frame 0 TX packets 152 bytes 15682 (15.6 KB) TX errors 0 dropped 0 overruns 0 carrier 0 collisions 0 enp0s17: flags=4163<UP,BROADCAST,RUNNING,MULTICAST> mtu 1500 inet 10.0.144.4 netmask 255.255.240.0 broadcast 10.0.159.255 inet6 fe80::43b3:fb84:607:91c1 prefixlen 64 scopeid 0x20<link> ether 08:00:27:07:94:bb txqueuelen 1000 (Ethernet) RX packets 4 bytes 1830 (1.8 KB) RX errors 0 dropped 0 overruns 0 frame 0 TX packets 155 bytes 15842 (15.8 KB) TX errors 0 dropped 0 overruns 0 carrier 0 collisions 0 enp0s18: flags=4163<UP,BROADCAST,RUNNING,MULTICAST> mtu 1500 inet 10.0.32.4 netmask 255.255.224.0 broadcast 10.0.63.255 inet6 fe80::3188:2f8f:453e:56a2 prefixlen 64 scopeid 0x20<link> ether 08:00:27:80:83:ff txqueuelen 1000 (Ethernet) RX packets 126 bytes 15566 (15.5 KB) RX errors 0 dropped 0 overruns 0 frame 0 TX packets 153 bytes 15862 (15.8 KB) TX errors 0 dropped 0 overruns 0 carrier 0 collisions 0 enp0s19: flags=4163<UP,BROADCAST,RUNNING,MULTICAST> mtu 1500 inet 10.0.32.5 netmask 255.255.224.0 broadcast 10.0.63.255 inet6 fe80::b4f5:923e:6086:3822 prefixlen 64 scopeid 0x20<link> ether 08:00:27:80:83:bb txqueuelen 1000 (Ethernet) RX packets 147 bytes 18360 (18.3 KB) RX errors 0 dropped 0 overruns 0 frame 0 TX packets 148 bytes 15625 (15.6 KB) TX errors 0 dropped 0 overruns 0 carrier 0 collisions 0 lo: flags=73<UP,LOOPBACK,RUNNING> mtu 65536 inet 127.0.0.1 netmask 255.0.0.0 inet6 ::1 prefixlen 128 scopeid 0x10<host> loop txqueuelen 1000 (Local Loopback) RX packets 84 bytes 5652 (5.6 KB) RX errors 0 dropped 0 overruns 0 frame 0 TX packets 84 bytes 5652 (5.6 KB) TX errors 0 dropped 0 overruns 0 carrier 0 collisions 0