Spring Framework에서 REST 개발시 URL Parameter 활용 하기

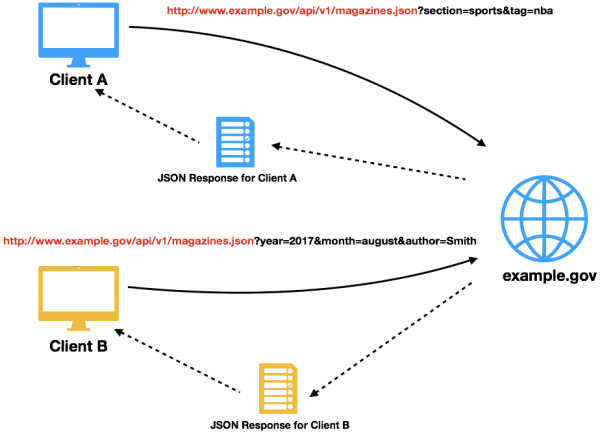
REST(Representational state transfer)를 개발 하다 보면 하나의 기저(Base) URL(예. http://www.example.gov/api/v1/magazines.json)을 사용하면서 호출 하는 클라이언트에 따라 조회 조건(URL Query)이나 응답(Response)이 완전히 달라져야 하는 경우가 있다. 이를 Spring Framework에서 구현하는 방법을 소개 한다.
HTTP Header 사용
필자가 가장 먼저 고려 했던 방법은 HTTP Header를 사용하는 것이었다. 먼저 클라이언트에 따라 다르게 처리 하기 위해 새로운 미디어 타입을 정의 했다.
- application/vnd.example.clientA+json
- application/vnd.example.clientB+json
그리고 이렇게 정의된 미디어 타입을 Spring RestController에 produces 값에 설정 하였다.
1 2 3 4 5 6 7 8 9 10 11 12 13 14 15 16 17@RestController @RequestMapping("/api/v1") public class MagazineRestController { @GetMapping(value = "magazines", produces = "application/vnd.example.clientA+json") public ResponseEntity<List<MagazineForClientA>> getMagazines( @RequestParam(value = "section") String section, @RequestParam(value = "tag") String tag) { // ... } @GetMapping(value = "magazines", produces = "application/vnd.example.clientB+json") public ResponseEntity<List<MagazineForClientB>> getMagazines( @RequestParam(value = "year") String year, @RequestParam(value = "month") String month, @RequestParam(value = "author") String author) { // ... } }
클라이언트는 REST 호출 시 HTTP Request Header 중 Accept에 미디어 타입을 추가하여 요청 하면 서버는 미디어 타입에 따라 URL Path(/api/v1/magazines)는 동일하지만 Query와 Response 값이 다르게 동작하게 된다.


하지만 HTTP Header 를 사용하게 되는 경우 테스트와 디버깅에 어려움이 있고, 필자의 경우 REST 문서화나 테스트를 위해서 Swagger를 사용하고 있는데 필자가 사용하고 있는 버전(springfox-swagger 2.6.1)에서는 이를 오롯이 지원 하지 않는다.
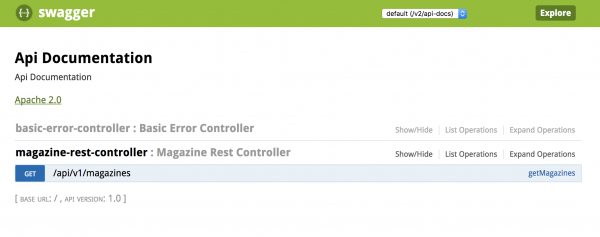
위의 Swagger UI를 보면 URL Query와 HTTP Response가 다르기 때문에 Swagger 상에서 2개가 존재해야 하지만 1개만 존재한다.
URL Parameter 사용
코드를 보기 전에 먼저 URL 파라메터가 무엇인지 알아보자.
Used by some schemes to specify input parameters. Params are name/value pairs. A URL can contain multiple params fields, separated from themselves and the rest of the path by semicolons (;). - HTTP:The Definitive Guide
HTTP:The Definitive Guide에서는 URL Parameter를 이름/값을 쌍으로 입력 파라메터를 기술하는 용도로 사용 한다라고 정의 하고 있으며, URL에서 URL Parameter는 아래와 같이 Path 뒤에 위치 한다.
<scheme>://<user>:<password>@<host>:<port>/<path>;<params>?<query>#<fragment>
기존의 HTTP Header를 URL Parameter로 대체해 보자.
Spring에서 URL Parameter를 사용하기 위해서는 추가 설정이 필요하다.
1 2 3 4 5 6 7 8 9@Configuration public class WebMvcConfiguration extends WebMvcConfigurerAdapter { @Override public void configurePathMatch(PathMatchConfigurer configurer) { UrlPathHelper urlPathHelper = new UrlPathHelper(); urlPathHelper.setRemoveSemicolonContent(false); configurer.setUrlPathHelper(urlPathHelper); } }
RestController 코드에는 Request Mapping에 URL Parameter를 추가 기술 한다.
1 2 3 4 5 6 7 8 9 10 11 12 13 14 15 16 17@RestController @RequestMapping("/api/v1") public class MagazineRestController { @GetMapping(value = "magazines;type=client-a") public ResponseEntity<List<MagazineForClientA>> getMagazines( @RequestParam(value = "section") String section, @RequestParam(value = "tag") String tag) { // ... } @GetMapping(value = "magazines;type=client-b") public ResponseEntity<List<MagazineForClientB>> getMagazines( @RequestParam(value = "year") String year, @RequestParam(value = "month") String month, @RequestParam(value = "author") String author) { // ... } }
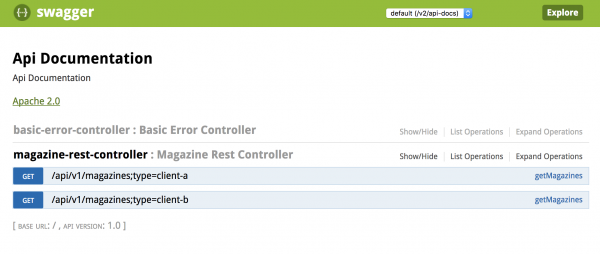
클라이언트에서는 별도의 Header 필요 없이 URL만으로 호출할 수 있으며, Swagger에서도 정상적으로 노출 되는 것을 확인할 수 있다.
- http://localhost:8080/api/v1/magazines;type=client-a?section=sports&tag=nba
- http://localhost:8080/api/v1/magazines;type=client-b?year=2017&month=auguest&author=Smith
결론
Spring에서 하나의 URL Path에 여러개의 Request Mapping을 하고 싶은 경우 HTTP Request Header를 사용하는 것도 좋은 방법이지만 테스트의 용이성 측면에서 URL Parameter를 고려해보는 것도 좋을 것 같다.