Neural Style Transfer 따라하기

Style Transfer를 해야 할 일이 생겨서 관련 자료를 정리하고, 주요 논문은 가능하면 직접 코딩하거나 이미 짜여진 코드를 분석하기로 마음 먹었다. 따라갈 로드맵은 Lunit Tech Blog의 Style Transfer을 참고했다.
Style Transfer
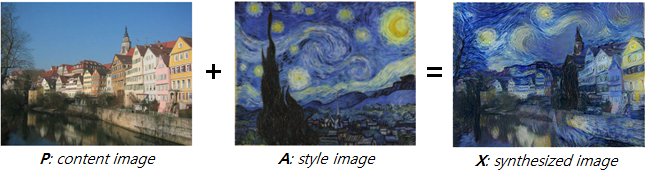
Style Transfer, image-to-image translation, 또는 texture transfer 등으로 불리는 이 문제는 한 이미지 P를 다른 이미지 A의 스타일을 가지는 새로운 이미지 X를 생성하는 방식이다.
로드맵
neural style transfer 방식은 2개의 구분할 수 있다.
- pre-trained된 모델을 기반으로 content image와 style image을 입력으로 이용해 이미지를 학습 하는 방법
- 장점
- 이미지 2장(content image와 style image)만으로 style transfer가 가능
- 단점
- 새로운 content 이미지를 변환하거나, 또는 새로운 style로 변환할 경우 다시 학습해야 함
- 장점
- pre-trained된 모델을 기반으로 content image와 style image을 입력으로 이용해 이미지 변환 네트워크를 학습하는 방법
- 장점
- 이미지 2장(content image와 style image)만으로 style transfer가 가능
- 새로운 content 이미지를 변환할 경우, 학습된 이미지 변환 네트워크에 대해 feed-forward만 하면 되고 따라서 재학습이 필요 없고 실시간 변환이 가능
- 단점
- style image는 대체로 그림(artistic image)로 한정되는 듯.
- 장점
- GAN을 기반으로 style transfer 모델을 직접 학습하는 방법
- 장점
- 생성 모델이 학습되면, 새로운 content 이미지를 변환 할 경우 feed-forward만 하면 되고 따라서 재학습이 필요없고 실시간 변환이 가능
- style image에 제한이 없는 듯(photo-realistic 변환 가능)
- 단점
- 학습을 위한 많은 데이터셋 확보가 필수적일 것
- 장점
이번에 따라해 보려는 로드맵은 각 neural style transfer 방식별로 다음과 같다.
- pre-trained된 모델을 기반으로 content image와 style image을 입력으로 이용해 이미지를 학습 하는 방법
- Image Style Transfer Using Convolutional Neural Networks, Leon A. Gatys
- pre-trained된 모델을 기반으로, 두 이미지를 합성하는 방법의 기초를 제시
- 이 방법이 가진 단점을 보완하기 위해 새로운 loss를 추가한 다양한 확장판이 존재
- Image Style Transfer Using Convolutional Neural Networks, Leon A. Gatys
- pre-trained된 모델을 기반으로 content image와 style image을 입력으로 이용해 이미지 변환 네트워크를 학습하는 방법
- A Learned Representation For Artistic Style, Vincent Dumoulin
- 이미지 변환 네트워크를 학습하는 기법을 통해 실시간 변환 방식을 제시한 Perceptual Losses for Real-Time Style Transfer and Super-Resolution을 개선
- 실시간 변환이라는 장점과 기존의 pre-trained 모델 기반의 여러개의 style image을 함께 학습할 수 있는 방법을 제시
- A Learned Representation For Artistic Style, Vincent Dumoulin
- GAN을 기반으로 style transfer 모델을 직접 학습하는 방법
- [pix2pix] Image-to-Image Translation with Conditional Adversarial Network, Phillip Isola
- Conditional GAN 기반
- [CycleGAN] Unpaired Image-to-Image Translation using Cycle-Consistent Adversarial Networks, Jun-Yan Zhu
- pix2pix와 같이 GAN 기반의 학습에서는 입력이미지와 출력 이미지 쌍(paired)이 필요하며, 이러한 데이터셋의 확보는 쉽지 않음
- CycleGAN으로 알려진 이 방법에서는 쌍을 짓지 않은 데이터셋을 이용해서 이미지를 변환하는 방법을 제시
- 생성 품질은 그렇게 좋지 않을 것
- StackGAN: Text to Photo-realistic Image Synthesis with Stacked Generative Adversarial Networks, Han Zhang
- 텍스트를 입력으로 고품질의 이미지를 생성
- [pix2pix] Image-to-Image Translation with Conditional Adversarial Network, Phillip Isola
이 글에서는 첫 번째로, neural style transfer의 시발점이 된 Leon A. Gatys의 Image Style Transfer Using Convolutional Neural Networks을 시작하려고 한다.
알고리즘: A Neural Algorithm of Artistic Style
컨셉
content image를 style image의 스타일을 가지도록 변환할 때, 더 정확히는 content image의 컨텐츠와 style image의 스타일을 가지는 새로운 이미지를 생성할 때, pre-trained된 CNN 모델의 특성(feature)를 사용하자는 것이다.
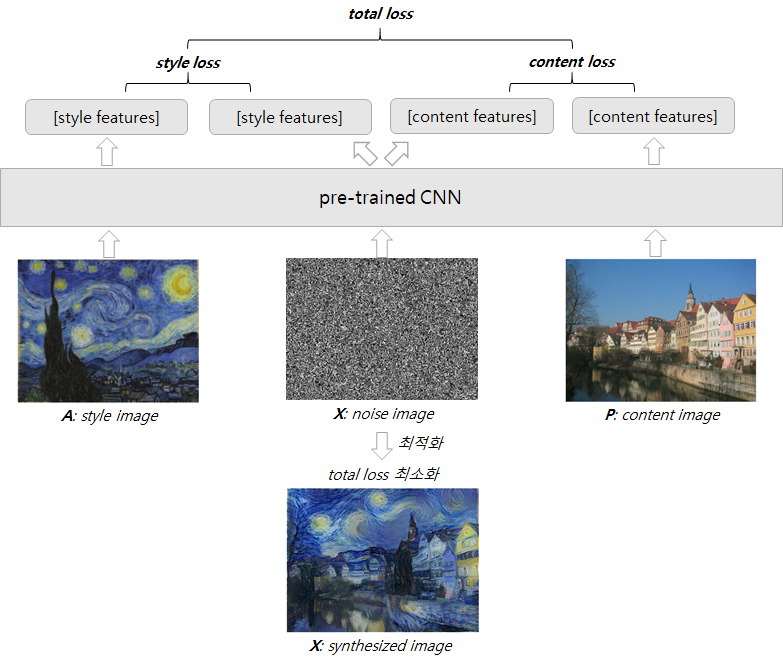
그림. 알고리즘 컨셉
이를 통해 style transfer 문제를 total loss를 최소화하는 과정, 즉 pre-trained CNN 모델을 최적화하는 문제로 변경했다. 이와는 별개로, 학습하려는 도메인과 독립적으로 pre-trained된 CNN 모델을 범용적인 특성(feature) 추출기로 사용할 수 있으며(CNN Features off-the-shelf: an Astounding Baseline for Recognition, Ali Sharif Razavian), CNN의 컨볼루션은 레이어가 깊어질수록 학습된 클래스에 특화된 개념을 추출할 수 있다(Visualizing and Understanding Convolutional Networks, Matthew D Zeiler).
따라서 이제 이 문제는 아래의 세 가지 단순한 문제로 재정의된다.
- CNN 모델은 무엇을 사용할 것인가?
- CNN 모델의 어느 레이어에서 특성(feature)를 추출할 것인가?
- 손실(loss)는 어떻게 정의할 것인가?
CNN 모델은 무엇을 사용할 것인가?
이 논문에서는 VGG-19 네트워크를 사용한다.
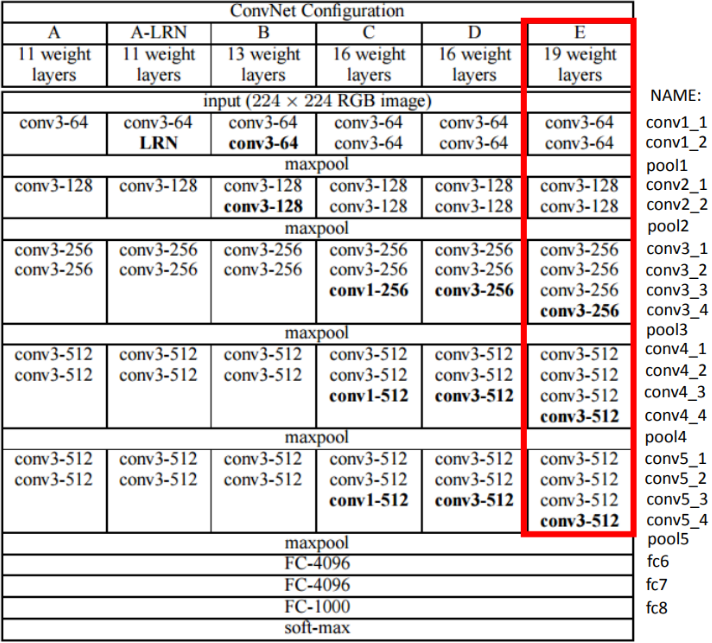
그림. VGG-19 네트워크
pre-trained된 모델에 대해 아래의 처리를추가로 실시한다.
- 네트워크 정규화 "We normalized the network by scaling the weights such that the mean activation of each convolutional filter over images and positions is equal to one" 네트워크의 가중치를 정규화한다
- average 풀링 사용 "... replacing the maximum pooling operation by average pooling yields slightly more appealing results" VGG-19 네트워크의 max pooling 대신 average pooling을 사용
CNN 모델의 어느 레이어에서 특성(feature)를 추출할 것인가?
CNN 모델의 레이어가 깊어질수록 추출된 특성은 다른 성질을 갖는다.
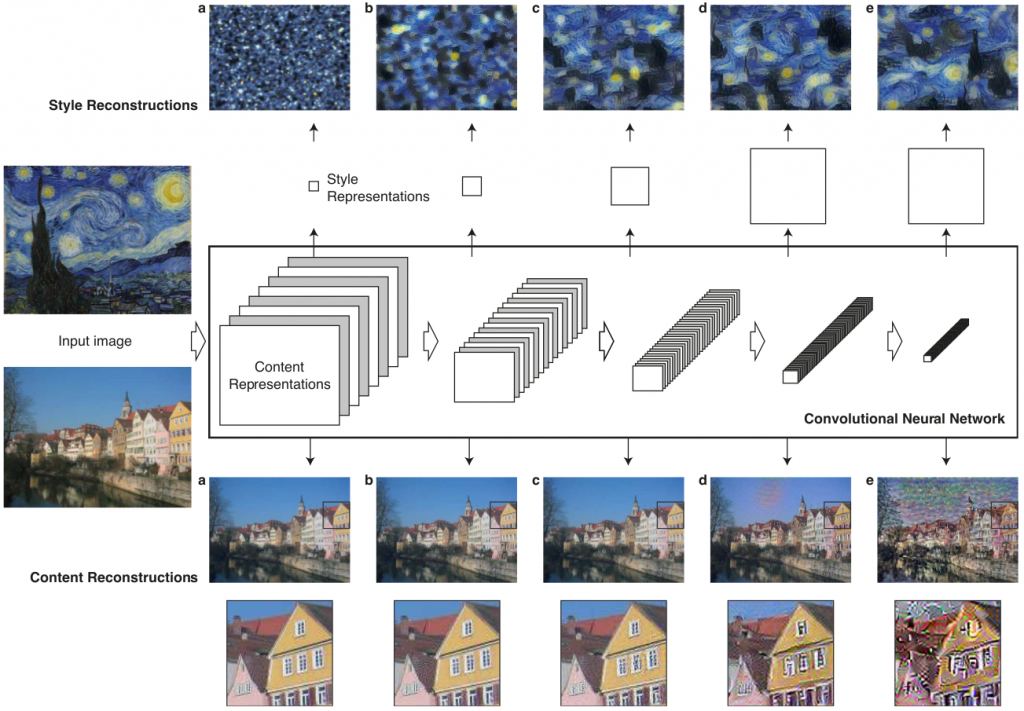
그림. 레이어별 feature
content feature
입력 이미지 p와 Conv. 레이어 l에 대해, 아래와 같이 feature map, F를 추출할 수 있다.
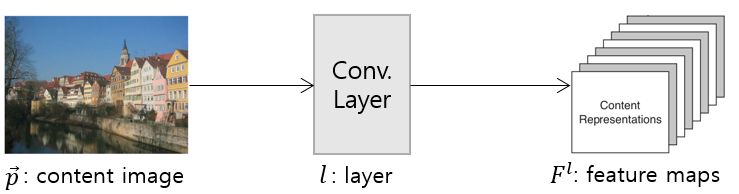
그림. content feature 추출
[그림. 레이어별 feature]에서는 'conv1_2(a)', 'conv2_2(b)', 'conv3_2(c)', 'conv4_2(d)', 'conv5_2(e)' 레이어에서 입력 이미지를 재구성한 이미지를 보여준다. 레이어가 깊어질수록 픽셀 수준의 정보는 사라지지만, 입력 이미지가 가진 semantic 정보(강 역의 집들)는 그대로 유지된다. 반면 낮은 레이어의 경우(a, b, c)에는 입력 이미지와 거의 동일하다. 따라서 깊은 레이어에서 content feature를 추출한다.
style feature
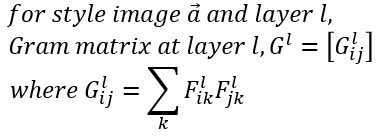
style 특성은 "Texture Synthesis Using Convolutional Neural Networks, Leon A. Gatys"에서 소개한 Gram matrix를 기반으로 한다. style/texture는 공간적인 정보와 무관해야 한다. 그래서 각 레이어의 feature map 사이의 상관관계(correlation)를 나타내는 Gram matrix를 사용한다. 레이어 l에서의 Gram matrix는 아래와 같이 정의된다.
style feature의 경우 단일 레이어가 아닌, 여러 레이어의 feature map의 상관관계를 동시에 본다. 이를 통해 이미지가 전역적으로 가진 레이아웃 정보가 아닌, 정적인(stationary) 정보를 다수의 스케일을 고려한 정보를 얻을 수 있다. [그림. 레이어별 feature]에서는 'conv1_1(a)', 'conv1_1, conv2_1(b)', 'conv1_1, conv2_1, conv3_1(c)', 'conv1_1, conv2_1, conv3_1, conv4_1(d)', 'conv1_1, conv2_1, conv3_1, conv4_1, conv5_1(e)' 레이어에서 입력 이미지를 재구성한 이미지를 보여준다. 깊은 레이어를 많이 포함할수록, 이미지가 가진 전역적인 레이아웃 정보가 아닌, 마치 이미지가 줌인되는 듯한 스타일을 얻어낸다.
손실(loss)는 어떻게 정의할 것인가?
간략화된 [그림. 알고리즘 컨셉] 대신, 실제 style transfer 알고리즘은 다음과 같다.
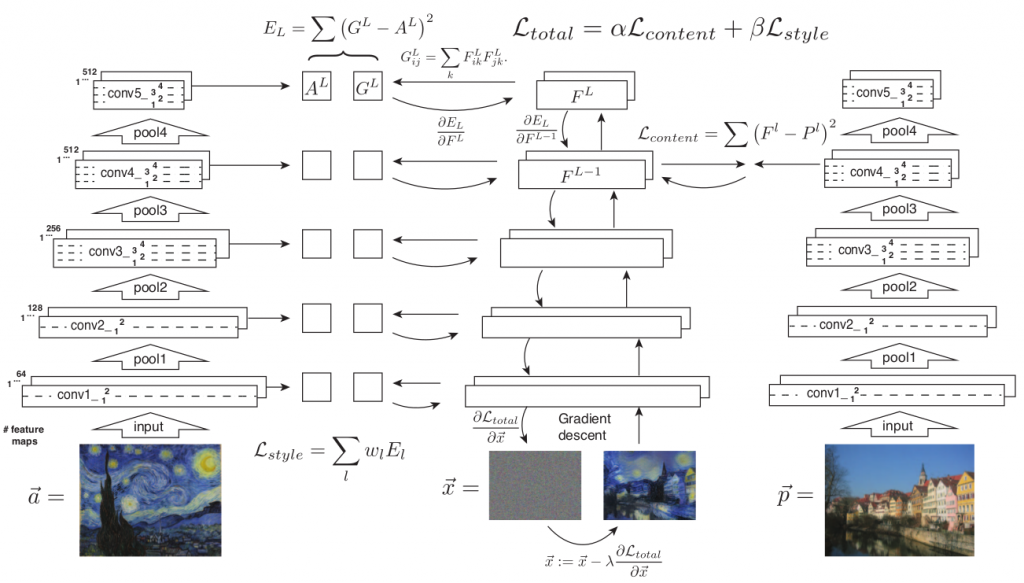
그림. style transfer 알고리즘
- content image p, style image a에 대해, 합성할 이미지인 x를 noise image로 초기화한다.
- 그리고 각 이미지 p, a, x를 신경망을 통해 피드포워드 한다.
- 그리고 p와 x에 대해서는 content feature 기반의 content loss를 계산한다.
- a와 x에 대해서는 style feature 기반의 style loss를 계산한다.
- 그리고content loss와 style loss를 합하여 total loss를 계산산한다.
- 그리고 total loss를 back propagation을 통해 noise image x를 업데이트한다.
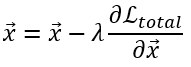
이때 네트워크 자체는 업데이트 되지 않으며, 생성하려는 입력 이미지 x 자체만이 아래와 같이 업데이트된다.
content loss
content image p와 합성할 이미지 x 사이의 content loss는 아래와 같이 계산한다. 먼저 content image p에 대해,
- content image p를 네트워크를 통해 피드포워드한다.
- content image p에 대한 레이어 l에서의 feature map P는 아래와 같이 정의된다.

마찬가지로 x에 대해서도 동일하게 정의한다.
- 합성할 image x를 네트워크를 통해 피드포워드한다.
- 합성할 image x에 대핸 레이어 l에서의 feature map F는 아래와 같이 정의된다.

그리고 레이어 l에서의 content loss는 아래와 같이 정의된다

style loss
style image a와 합성할 이미지 x 사이의 style loss는 아래와 같이 계산한다. 먼저 style image a에 대해,
- style image a를 네트워크를 통해 피드포워드한다.
- style image a에 대한 레이어 l에서의 Gram matrix A는 아래와 같이 정의된다.

마찬가지로 x에 대해서도 동일하게 정의한다.
- 합성할 image x를 네트워크를 통해 피드포워드한다.
- 합성할 image x에 대한 레이어 l에서의 Gram matrix G는 아래와 같이 정의된다.

그리고 레이어 l에서의 style loss는 아래와 같이 정의된다

style feature의 경우 여러 레이어를 동시에 사용하므로 total style loss는 아래와 같다.

total loss
content loss와 style loss를 결합한 total loss는 다음과 같다.
![]()
이때 content loss와 style loss에 대해 각각 가중치를 적용한다. 가중치를 어떻게 적용하느냐에 따라 다른 x가 생성된다.
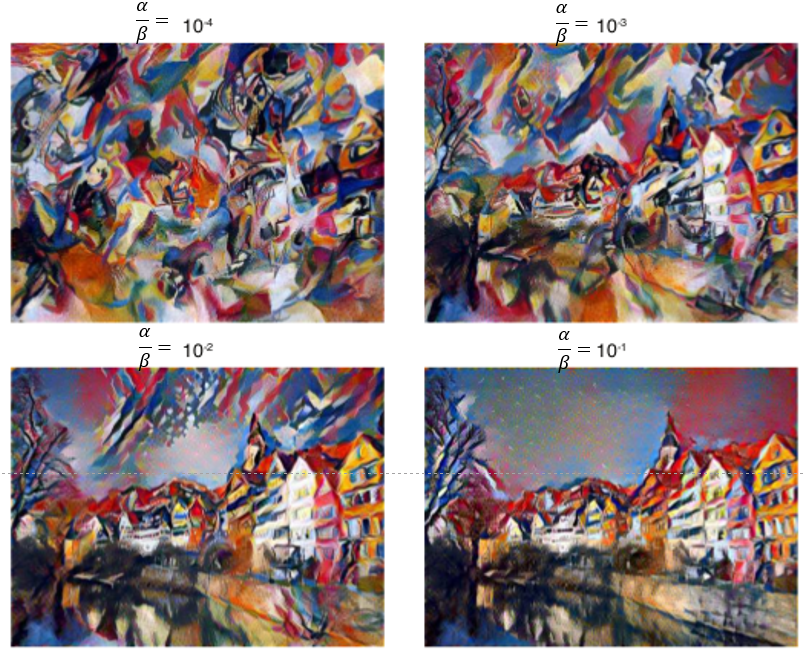
그림. 가중치 변경에 따른 합성 이미지 x의 변화
위의 그림에서 보듯이 style loss에 가중치를 많이 두면(좌측 상단), 스타일 중심적인 이미지 x가 생성된다. 반면, content loss에 가중치를 많이 두면(우측 하단) 컨텐츠 중심적인 이미지 x가 생성된다.
구현 따라하기
논문의 저자인 Leon A. Gatys가 Pytorch로 구현한 leongatys/PytorchNeuralStyleTransfer가 있지만, 이보다는 torch로 구현한 jcjohnson/neuralstyle을 참조했다. Pytorch보다는 Torch가 더 익숙했기 때문이다.
샘플 코드
샘플 코드는 socurites/image-style-transfer.torch에서 클론할 수 있다. 샘플 코드는 참조한 jcjohnson/neuralstyle을 리팩토링 했고, 알고리즘을 이해할 수 있게 단순화 했다.
실행하기
학습은 아래와 같이 실행할 수 있다.
1$ th neural-style-transfer.lua -content_image examples/inputs/tubingen.jpg -style_image examples/inputs/seated-nude.jpg
각 에폭별 합성된 이미지는 다음과 같다.
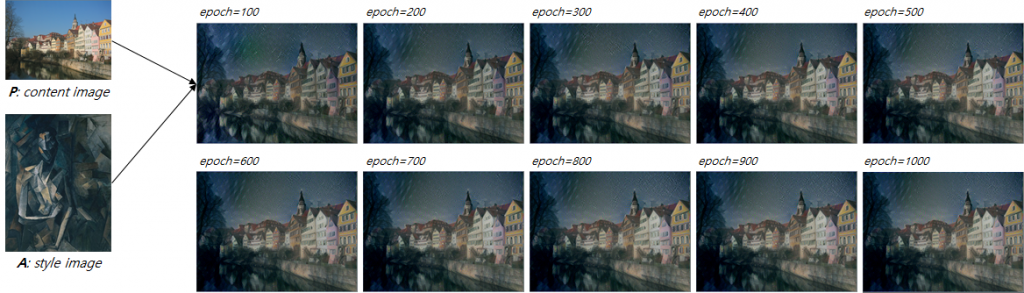
그림. 각 에포벽 합성된 이미지
코드 분석
실행 옵션은 다음과 같다.
1 2 3 4 5 6 7 8 9 10 11 12 13 14 15 16 17 18 19 20 21 22-- Image options cmd:option('-style_image', 'examples/inputs/seated-nude.jpg', 'Style target image') cmd:option('-content_image', 'examples/inputs/tubingen.jpg', 'Content target image') cmd:option('-image_size', 512, 'Maximum height / width of generated image') -- Optimization options cmd:option('-content_weight', 5e0) cmd:option('-style_weight', 1e2) cmd:option('-learning_rate', 1e1) cmd:option('-num_iterations', 1000) -- GPU options cmd:option('-gpu', '0', 'Zero-indexed ID of the GPU to use; for CPU mode set -gpu = -1') -- Model options cmd:option('-proto_file', '/home/socurites/git/torch/neural-style/models/VGG_ILSVRC_19_layers_deploy.prototxt') cmd:option('-model_file', '/home/socurites/git/torch/neural-style/models/VGG_ILSVRC_19_layers.caffemodel') cmd:option('-backend', 'nn', 'nn|cudnn|clnn') cmd:option('-pooling', 'avg', 'max|avg') -- Layer options cmd:option('-content_layers', 'relu4_2', 'layers for content') cmd:option('-style_layers', 'relu1_1,relu2_1,relu3_1,relu4_1,relu5_1', 'layers for style') -- Output options cmd:option('-print_iter', 50) cmd:option('-save_iter', 100)
- content_weight / style_weight content loss와 style loss에 대한 가중치
- pooling 논문에서 언급했듯이, VGG-19 네트워크의 max pooling 대신 avg pooling을 기본값으로 사용한다
- content_layers content feature를 추출할 레이어. 논문에서 언급했듯이 깊은 레이어 중 4_2 레이어를 사용
- style_layers 논문에서 언급했듯이 깊은 레이어를 모두 사용
- model_file 논문에서는 normalized된 모델을 사용하나, 여기에서는normalize하지 않고 pre-trained된 모델을 그대로 사용
pre-trained 모델 로드
pre-trained된 모델을 로드한다.
1 2-- Load pre-traing vgg19 model cnn = loadcaffe.load(params.proto_file, params.model_file, params.backend):type(dtype)
content 이미지 로드
학습에 사용할 content 이미지를 로드한다.
1 2 3 4-- Load content image content_image = image.load(params.content_image, 3) content_image = image.scale(content_image, params.image_size, 'bilinear') content_image_caffe = vgg_img_process().preprocess(content_image)
이미지에 대한 전처리 함수인 preprocess()는 vgg-img-process.lua에 정의되어 있다.
1 2 3 4 5 6function util.preprocess(img) img = util.rgb2bgr(img) img = util.scale_up(img) img = util.subtract_mean(img) return img:float() end
참고로 합성할 이미지를 생성하는 함수인 deprocess()도 vgg-img-process.lua에 정의되어 있으며, preprocess()의 반대 방향으로 처리할 수 있다.
1 2 3 4 5 6function util.deprocess(img) img = util.add_mean(img) img = util.rgb2bgr(img) img = util.scale_down(img) return img end
style 이미지 로드
학습에 사용할 style 이미지도 유사하게 로드할 수 있다.
1 2 3 4-- Load style image style_image = image.load(params.style_image, 3) style_image = image.scale(style_image, params.image_size, 'bilinear') style_image_caffe = vgg_img_process().preprocess(style_image)
피드 포워드 네트워크 정의
content 이미지 p, style 이미지 a, 합성할 이미지 x를 피드포워드할 네트워크를 정의한다. 기본 VGG-19 네트워크에서 pooling을 avg pooling으로, 그리고 content_layers와 style_layers 각각에 loss를 추가한다.
1 2 3 4 5 6 7 8 9 10 11 12 13 14 15 16 17 18 19 20 21 22 23 24 25 26 27 28 29 30 31 32 33 34 35net = nn.Sequential() for i = 1, #cnn do if next_content_idx <= #content_layers or next_style_idx <= #style_layers then local layer = cnn:get(i) local name = layer.name local layer_type = torch.type(layer) local is_pooling = (layer_type == 'cudnn.SpatialMaxPooling' or layer_type == 'nn.SpatialMaxPooling') if is_pooling and params.pooling == 'avg' then assert(layer.padW == 0 and layer.padH == 0) local kW, kH = layer.kW, layer.kH local dW, dH = layer.dW, layer.dH local avg_pool_layer = nn.SpatialAveragePooling(kW, kH, dW, dH):type(dtype) local msg = 'Replacing max pooling at layer %d with average pooling' print(string.format(msg, i)) net:add(avg_pool_layer) else net:add(layer) end if name == content_layers[next_content_idx] then print("Setting up content layer", i, ":", layer.name) local loss_module = nn.ContentLoss(params.content_weight):type(dtype) net:add(loss_module) table.insert(content_losses, loss_module) next_content_idx = next_content_idx + 1 end if name == style_layers[next_style_idx] then print("Setting up style layer ", i, ":", layer.name) local loss_module = nn.StyleLoss(params.style_weight):type(dtype) net:add(loss_module) table.insert(style_losses, loss_module) next_style_idx = next_style_idx + 1 end end end net:type(dtype)
content loss 구현
content loss에 대한 구현은 ContentLoss.lua에 정의된다. 앞서 언급했듯이, 네트워크 자체는 업데이트 되지 않으며, 생성하려는 입력 이미지 x 자체만이 업데이트되어야 한다. 이를 위해 updateGradInput()이 아래와 같이 구현된다.
1 2 3 4 5 6 7 8 9 10 11 12function ContentLoss:updateGradInput(input, gradOutput) if self.mode == 'loss' then if input:nElement() == self.target:nElement() then self.gradInput = self.crit:backward(input, self.target) end self.gradInput:mul(self.strength) self.gradInput:add(gradOutput) else self.gradInput:resizeAs(gradOutput):copy(gradOutput) end return self.gradInput end
이 구현 부분은 제대로 이해가 되지 않는데, 특히 gradInput:add(gradOutput) 부분이다. Image Style Transfer Using Convolutional Neural Networks 논문을 Pytorch로 구현한 leongatys/PytorchNeuralStyleTransfer에 대한 설명서인 Neural Transfer with Pytorch에서는 아래와 같이 구현되어 있다.
1 2 3 4 5 6 7#get network vgg = VGG() vgg.load_state_dict(torch.load(model_dir + 'vgg_conv.pth')) for param in vgg.parameters(): param.requires_grad = False ... opt_img = Variable(content_image.data.clone(), requires_grad=True)
즉, pre-trained된 vgg 네트워크에 대해서는 requires_grad = False를 통해 업데이트 하지 않도록 하며, 입력 이미지 opt_img에 대해서는 requires_grad = True를 통해 이미지가 업데이트 될 수 있도록 한다.
style loss 구현
style loss 및 Gram matrix에 대한 구현은 StyleLoss.lua, GramMatrix.lua에 정외된다.
content/style feature 추출
content loss 및 style loss 계산을 위해 content 이미지 p와 style 이미지 a를 네트워크를 통해 피드포워드한다.
1 2 3 4 5 6 7 8 9 10 11 12 13 14 15 16 17 18print 'Capturing content targets' net:forward(content_image_caffe:type(dtype)) -- Capture style targets for i = 1, #content_losses do content_losses[i].mode = 'none' end for j = 1, #style_losses do style_losses[j].mode = 'capture' end print 'Capturing style targets' net:forward(style_image_caffe:type(dtype)) -- Set all loss modules to loss mode for i = 1, #content_losses do content_losses[i].mode = 'loss' end for i = 1, #style_losses do style_losses[i].mode = 'loss' end
합성할 이미지 x 정의
합성할 이미지를 정의한다.
1 2 3-- Initialize the image img = torch.randn(content_image:size()):float():mul(0.001) img = img:type(dtype)
학습하기
일반적인 방법에 따라 optim 패키지를 이용하여 학습을 진행한다. 논문에서 사용한 옵티마이저인 L-BFGS 대신 adam 옵티마이저를 사용한다.
1 2 3 4 5 6 7 8 9 10 11 12 13 14 15 16 17 18 19 20 21 22-- Define feval num_calls = 0 function feval(x) num_calls = num_calls + 1 net:forward(x) local grad = net:updateGradInput(x, dy) local loss = 0 for _, mod in ipairs(content_losses) do loss = loss + mod.loss end for _, mod in ipairs(style_losses) do loss = loss + mod.loss end print_losses(params.num_iterations, params.print_iter, num_calls, loss, content_losses, style_losses) save_output_img(params.save_iter, params.num_iterations, num_calls, img) collectgarbage() return loss, grad:view(grad:nElement()) end print('Running optimization with ADAM') for t = 1, params.num_iterations do local x, losses = optim.adam(feval, img, optim_state) end
주의할 점은 네트워크를 업데이트하지 않으므로 net:backward() 대신 net:updateGradInput()을 사용한 부분이다.
참고자료
- Image Style Transfer Using Convolutional Neural Networks, Leon A. Gatys
- Texture Synthesis Using Convolutional Neural Networks, Leon A. Gatys
- Lunit Tech Blog, Style Transfer
- CNN Features off-the-shelf: an Astounding Baseline for Recognition, Ali Sharif Razavian
- Visualizing and Understanding Convolutional Networks, Matthew D Zeiler
- leongatys/PytorchNeuralStyleTransfer, Github
- jcjohnson/neuralstyle, Github
- socurites/image-style-transfer.torch, Github
- Neural Transfer with Pytorch