Zeppelin Paragraph 공유 시 자동 로그인 구현

현재 Zeppelin을 중국 내 서비스에 적용하고 있는 중입니다. Zeppelin을 적용하는 중에 Zeppelin에서 만든 Paragraph를 다른 서비스의 화면 내에 한 영역으로 표시해 달라는 요구 사항이 나오게 되어 기존 Zeppelin 코드를 수정하여 적용하였습니다. 여기에 추가로 현재 서비스의 사용자 권한 관리를 WeChat의 기업 계정을 이용하여 관리하고 있는데 이 계정과 연동되도록 해야 하는 요구사항이 있었습니다. 이번 글에서는 이 요구사항을 만족 시키기 위해 어떻게 구성하면 되는지에 대한 대략적인 컨셉과 구현된 내용을 공유하겠습니다.
시연
백문이 불여일견이라고 먼저 구현된 내용을 보겠습니다.
제가 운영하는 서비스는 웹, 모바일 모두 WeChat을 이용하여 Single Sing On을 적용하고 있습니다. 관리자가 사용하는 서비스도 동일한 인증을 사용합니다. 중국의 많은 서비스는 QRCode를 이용하여 로그인을 하는데 대부분은 WeChat에 로그인한 다음 해당 QRCode 스캔하면 WeChat의 OAuth와 연동하여 로그인하는 방식입니다. 이 방식의 장점은 서비스별로 ID/Password를 기억하지 않아도 된다는 점과 사용자 가입 장벽을 낮출 수 있는 것 같습니다.
Zeppelin의 Paragraph 공유 기능
Zeppelin의 데이터 분석 결과를 별도의 화면을 구성하지 않고도 분석가가 만든 화면을 그대로 다른 서비스의 화면에 추가할 수 있는 기능을 제공합니다. Paragraph 공유 기능인데 각 Paragraph에 대해 유일한 URL을 제공하고 이 URL을 iframe을 이용하여 다른 서비스의 화면에 임베딩하면 별도의 작업없이 쉽게 Dashboard를 구성할 수 있습니다.
이런 좋은 기능을 실제 서비스 운영중에는 사용하기 어려운 점이 있습니다. 물론 작은 스타트업의 경우 내부 몇명만 사용하면 되기 때문에 권한이나 인증에 대해서는 고려를 하지 않겠지만 조금만 조직이 커지거나 외부에서도 이런 정보에 접근하고 싶은 경우 인증된 사용자에게만 노출하는 기능이 매우 중요합니다.
하지만 현재 사용 중인 Zeppelin 0.7.1 버전에서는 Paragraph 공유 기능에 대해서 별도 인증 기능을 제공하지 않습니다. 따라서 다른 서비스에 Zeppelin의 Paragraph를 추가하기 위해서는 사용자는 Zeppelin 로그인을 한번 더 해야 하는 번거로움이 있습니다. 또한 Zeppelin 내에서 별도로 인증 관리를 하거나 LDAP 등을 사용하여 통합 인증과 연결해야 하는 불편함이 있습니다.
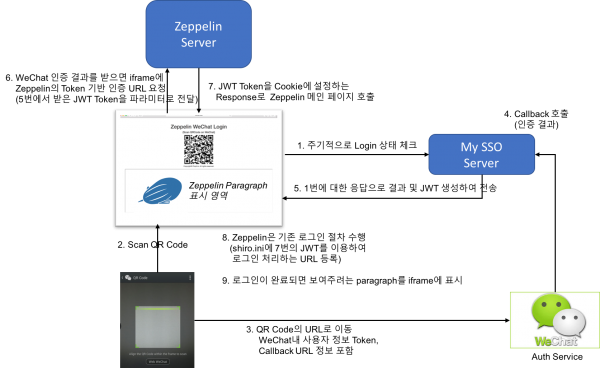
SingleSingOn 컨셉
LDAP, Active Directory 등 복잡하게 구성하기 싫고 기존의 SSO 환경인 WeChat 기반 SSO에 Zeppelin도 포함시키자는 생각으로 다음과 같은 로그인 흐름을 생각해보았습니다.
구현
현재 Zeppelin의 코드 수정 없이 이 흐름을 처리하기 어려워서 몇가지 코드를 추가하여 위 기능을 구현하였습니다. 구현 시 화면 관련 코드는 수정하지 않으려고 했습니다. 이유는 화면쪽은 코드의 변화도 많고 Angular 기반이라 손에 익숙하지 않아서 서버쪽 코드 수정만으로 위 기능을 구현하였습니다.
위 기능을 구현하기 위해서는 Zeppelin에 다음과 같은 2가지 추가 구현과 1가지 설정 사항이 필요합니다.
- My SSO Server에서 로그인한 사용자의 정보 등이 담긴 JWT를 받아주는 Endpoint(URL)
- 기존 ID/Password 방식의 로그인이 아닌 Cookie에 설정된 JWT 기반의 로그인 API
- conf/shiro.ini 파일에서 "shiro.loginUrl" 값에 2번의 새로운 로그인 API URL 설정
먼저 첫번째 Endpoint는 간단하게 Servlet으로 만들어서 ZeppelinServer에 등록하였습니다.
1 2 3 4 5 6 7 8 9 10 11 12 13 14 15 16public class JwtCallbackServlet extends HttpServlet { private static final long serialVersionUID = -6154475799000019575L; protected void doGet(HttpServletRequest request, HttpServletResponse response) throws ServletException, IOException { response.setContentType("text/html"); String token = request.getParameter("token"); # 파라미터로 받은 JWT를 cookie에 설정 Cookie cookie = new Cookie("jwt_token", token); cookie.setPath("/"); response.addCookie(cookie); response.setStatus(HttpServletResponse.SC_OK); # Zeppelin index 화면으로 이동 response.getWriter().println("<script>document.location.href='/';</script>"); } }
ZeppelinServer 등록은 다음 코드로 등록하였습니다.
1 2 3 4 5 6 7 8 9 10 11 12 13 14public class ZeppelinServer extends Application { ... public static void main(String[] args) throws InterruptedException { ... ContextHandlerCollection contexts = new ContextHandlerCollection(); jettyWebServer.setHandler(contexts); # 다음 코드를 추가 ServletContextHandler jwtServletHandler = new ServletContextHandler(ServletContextHandler.SESSIONS); jwtServletHandler.setContextPath("/sso"); contexts.addHandler(jwtServletHandler); jwtServletHandler.addServlet(new ServletHolder(new JwtCallbackServlet()), "/jwt"); ... } }
위와 같이 Servlet을 등록하면 위 그림에서 6번에 iframe의 src 설정을 "http://<zeppelin_server>/sso/jwt?token=<jwt>" 와 같이 하면 할 수 있습니다. 이렇게 /sso/jwt를 호출하면 Servlet 코드의 구현에서와 같이 단순히 Response에 JWT 값을 Cookie에 추가하도록 하고 Zeppelin index 페이지로 이동시킵니다. Zeppelin의 index 페이지는 Response에서 받은 Cookie 를 설정하고 원래 Zeppelin 의 인증 절차를 따르게 됩니다.
이때 로그인 처리를 위해 conf/shiro.ini 에 설정한 URL(shiro.loginUrl=/api/login/jwt)을 호출하게 되는데 그 코드는 다음과 같습니다. 아래 코드는 기존 Zeppelin의 LoginRestApi 클래스에 추가하였습니다.
1 2 3 4 5 6 7 8 9 10 11 12 13 14 15 16 17 18 19 20 21 22 23 24 25 26 27 28 29 30 31 32 33 34 35 36 37 38 39 40 41 42 43 44 45 46 47 48 49 50 51 52 53 54 55 56 57 58 59 60 61 62 63 64 65 66 67 68 69 70 71 72 73 74@Path("/login") @Produces("application/json") public class LoginRestApi { ... @GET @Path("/jwt") public Response tokenLogin(@CookieParam("jwt_token") Cookie tokenCookie) { # 이 부분은 새로 만든 코드 ZeppelinConfiguration conf = ZeppelinConfiguration.create(); String userName = null; if (tokenCookie != null) { try { String jwtKey = conf.getString(ConfVars.ZEPPELIN_JWT_KEY); Algorithm algorithm = Algorithm.HMAC256(jwtKey); JWTVerifier verifier = JWT.require(algorithm) .withIssuer("popit_sso") .build(); //Reusable verifier instance # expired_at 등 추가 JWT 검증 처리 DecodedJWT jwt = verifier.verify(tokenCookie.getValue()); Claim claim = jwt.getClaim("user_name"); userName = claim.asString(); } catch (Exception e) { LOG.error(e.getMessage(), e); } } # 기존 login 코드 그대로 사용(패스워드는 미리 정해진 패스워드 사용 JsonResponse response = null; // ticket set to anonymous for anonymous user. Simplify testing. Subject currentUser = org.apache.shiro.SecurityUtils.getSubject(); if (currentUser.isAuthenticated()) { currentUser.logout(); } if (userName != null && !currentUser.isAuthenticated()) { try { UsernamePasswordToken userToken = new UsernamePasswordToken(userName, "패스워드 "); // token.setRememberMe(true); currentUser.login(userToken); HashSet<String> roles = SecurityUtils.getRoles(); String principal = SecurityUtils.getPrincipal(); String ticket; if ("anonymous".equals(principal)) ticket = "anonymous"; else ticket = TicketContainer.instance.getTicket(principal); Map<String, String> data = new HashMap<>(); data.put("principal", principal); data.put("roles", roles.toString()); data.put("ticket", ticket); response = new JsonResponse(Response.Status.OK, "", data); //if no exception, that's it, we're done! //set roles for user in NotebookAuthorization module NotebookAuthorization.getInstance().setRoles(principal, roles); } catch (UnknownAccountException uae) { //username wasn't in the system, show them an error message? LOG.error("Exception in login: ", uae); } catch (IncorrectCredentialsException ice) { //password didn't match, try again? LOG.error("Exception in login: ", ice); } catch (LockedAccountException lae) { //account for that username is locked - can't login. Show them a message? LOG.error("Exception in login: ", lae); } catch (AuthenticationException ae) { //unexpected condition - error? LOG.error("Exception in login: ", ae); } } if (response == null) { response = new JsonResponse(Response.Status.FORBIDDEN, "", ""); } // response. LOG.warn(response.toString()); return response.build(); }
위 코드는 길어 보이지만 실제 기존의 ID/Password 기반의 login 모듈 코드를 복사하였고, 앞부분에 JWT 처리하는 부분만 추가되었습니다.
통합하기
필자의 SSO 환경에서는 WeChat을 사용하였지만 일반적인 구성도 가능합니다. 위와 같이 제플린을 구성하였다면 원래 사용자가 사용하려면 서비스 인증 후 JWT 토큰을 만들어서 Zeppelin의 로그인을 처리할 iframe에게 첫번째 Servlet의 URL로 구성하면 iframe 내에서 Zeppelin 인증이 되었기 때문에 이 브라우저에서는 Zeppelin의 모든 Paragraph를 인증된 상태로 사용할 수 있게 됩니다. 주의할 점은 서비스 Logout시 Zeppelin의 세션도 반드시 종료시켜주어야 합니다.
마치며
Zeppelin의 Paragraph 공유 시 자동 인증 처리하는 기능을 위해 추가로 구현한 내용을 소개 드렸습니다. 이런 코드를 Zeppelin 커뮤니티로 PR을 보내는 것이 잘 사용하는 것에 대한 보답이라 생각합니다. 다만, 손에 잡혀있는 일이 많아 오픈소스로 올리는데 까지는 어려울 것 같아 글로써 공유하였습니다. 잉여가 되시는 분이 있으면 이 개념 또는 코드를 이용해서 올려주셔도 무방합니다.
코드는 정리되는대로 github(https://github.com/babokim/zeppelin) 에 올리도록 하겠습니다.